
James loves garlic chives (부추 – buchu). He has been talking about it quietly and subtly for the past decade, wondering when I would be making it into kimchi for him. I didn’t realize how much he enjoyed eating the stuff until we were dining at a Korean restaurant one day; in addition to many of the banchan (반찬 – side dishes), he couldn’t stop eating the chives that came with our meal.
Quite some time passed before I decided to make this kimchi at home. I think it wasn’t because I didn’t know how. It’s probably because regular kimchi or radish kimchi were just the first choice of all the staple Korean side dishes out there.
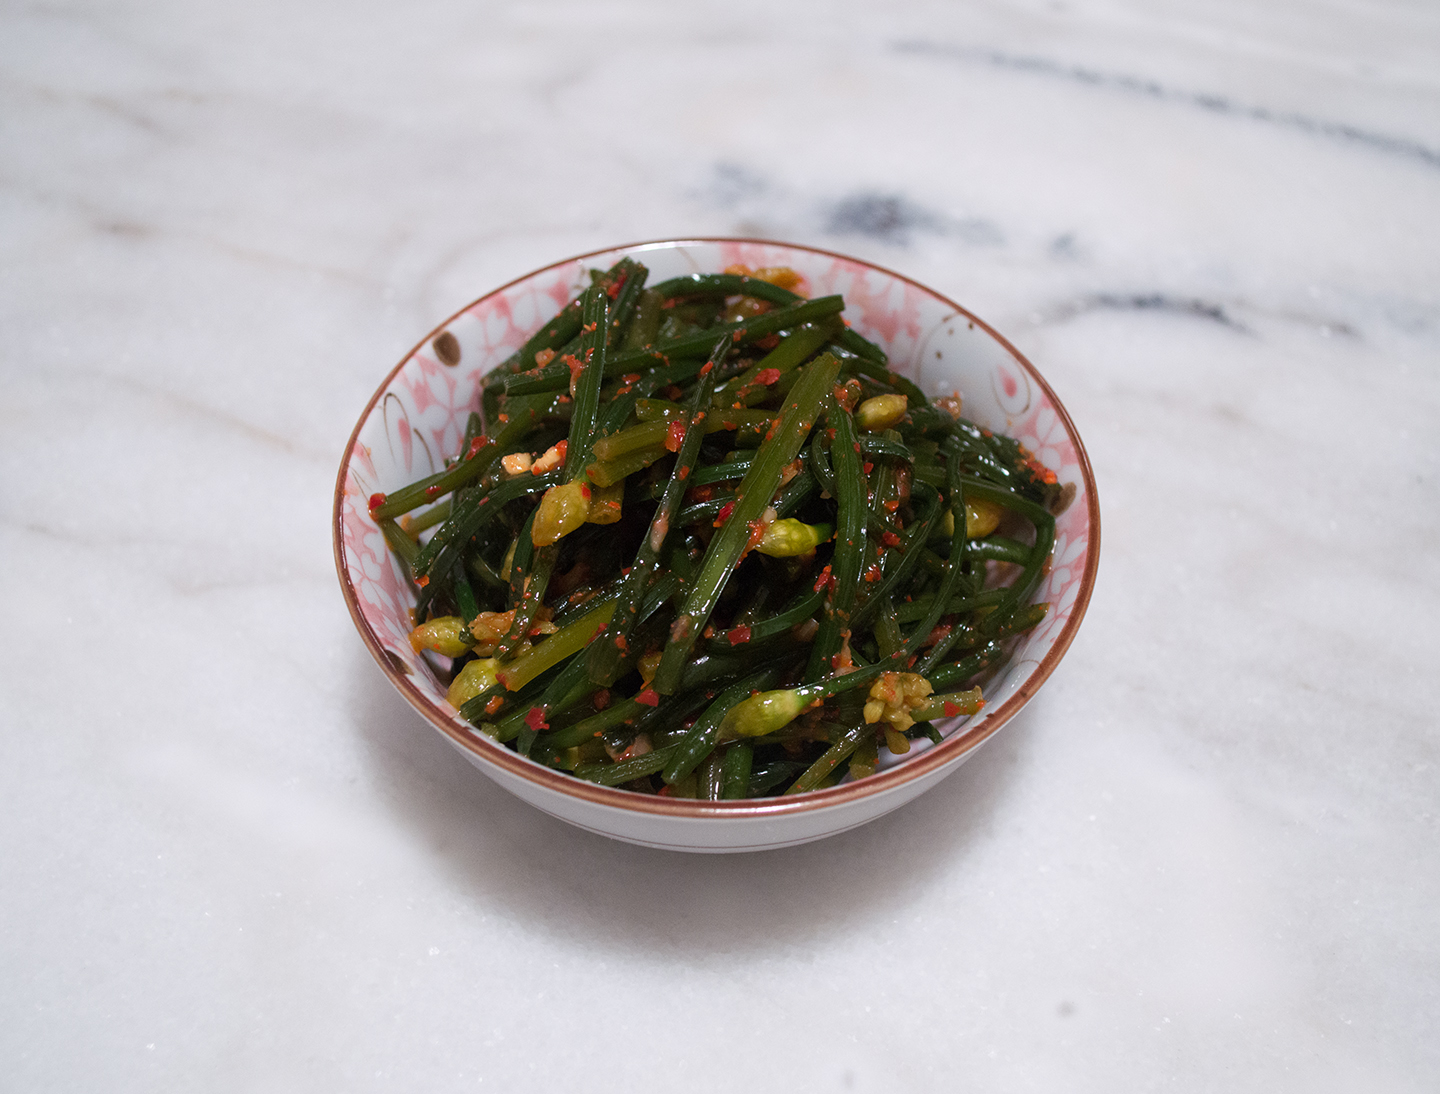
As a result, my mom and I talked through the steps before I settled on the recipe below. We found the garlic chives a bit wilted at the Asian grocery store, so we purchased some chives flowers (a delicious substitute!). Additionally, this dish has a bit more rice paste than I initially wanted, but it turned out delicious! A happy miscalculation!
Recipe for Buchu Kimchi (부추김치) - Garlic Chives Kimchi
- About 1 Liter
- Preparation:
- Cooking:
Ingredients
- 30g (3T) Mochiko (Sweet Rice Flour)
- 240g (1 cup) Room Temperature Water
- 2 bunches of Garlic Chives, each bunch about 2 inches in diameter
- 18-27g (2-3T) Kosher Salt
- 6g (¾T) Garlic
- 3g (½T) Ginger
- 30-40g (about 6-8T) Red Pepper Flakes
- 7g (1t) Salted Fermented Shrimp
- 15g (1T) Fish Sauce
Procedure
- Put the Mochiko into a small saucepan with 120g (½-cup) of water. Stir with a spatula and let it sit for 10-15 minutes.
- Once the flour looks hydrated, place it over a low-medium flame. Stir constantly while cooking. As it begins to thicken, lower the flame. Slowly add the rest of the 120g (½-cup) of water, about 30g (2T) at a time, making sure the water is well incorporated before adding more.
- Continue stirring on a low flame. The rice mixture will thicken and become translucent. Stir for another minute.
- Turn off the heat and set aside to cool to room temperature.
- As the rice paste is cooling, look over your garlic chives and remove bruised and wilted stalks. If you find any woody parts at the base, cut off those sections. Wash thoroughly and drain. Cut the chives into 2-inch lengths. Set them aside in a large bowl.
- Finely mince your garlic and fresh ginger root, and set those aside.
- Once the rice paste has cooled, bring all of the ingredients together into the bowl of chives. Mix well, being careful to not overly squish the kimchi.
- Taste-test and see if the kimchi needs more fish sauce, shrimp, or salt. It should be quite briny and salty.
- Place all of the chives into a container and cover. Set aside for about 1-2 days in room temperature. Afterwards, place into the refrigerator for a few days before eating.
- Enjoy the garlic chives kimchi with the rest of your side dishes and a steaming bowl of rice!
*Bunny Wisdom*
- *Many of these notes are echoes of what needs to be done to make regular kimchi; however, I'll repeat what's important below.*
- Hydrating any kind of fine powder requires a little bit of patience. The resting period allows the dry ingredient to absorb the water, preventing large flour pockets.
- Take care to lower the heat if the mixture seems to be thickening faster than it is possible for you to incorporate the rest of the water.
- The continuous stirring prevents sticking and burning on the bottom of the saucepan.
- You will notice the mixture will go from opaque to translucent. Simmer for a minute, stirring and watching slow bubbles surface like the Bubbling Mud Pots of Yellowstone National Park. You don't want it to be boiling.
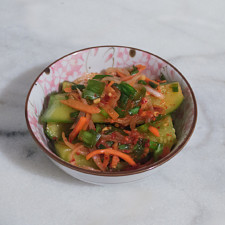
- You'll notice that there are chives in the regular grocery stores; while these are equally delicious, they aren't the garlic chives that are necessary for this recipe. Regular chives are hollow, while garlic chives are flat. They're easily found at Asian groceries. When you're there, you'll also find that there are skinny ones and thicker ones. I prefer using the thinner ones, as they aren't as woody. Sometimes the markets don't have what you need, so if you can only source the thicker garlic chives, that's fine. In this recipe, you can see that I've used garlic chives flowers. Kitty loves chives flowers, and they looked super fresh in the market, so I decided to use them instead!
- The chives don't necessarily have to be cut before seasoning. You are welcome to keep the length, make the kimchi, and store it spiraled in the container. Just before serving, remember to slice the chives to shorter lengths to make it easier for consumption. We decided to slice the lengths before making the kimchi, because it's less effort later.
- When mixing all of the ingredients together, take care not to massage and bruise the chives. To avoid this from happening, it's helpful to mix all of the seasoning ingredients together, and then bring the seasoning to the chives.
- You can eat this as early as you want, but the more complex savory flavors begin developing after the first week. The shrimp flavor mellows, and the spicy heat from the garlic chives settles down.
**Here are some of the ingredients I use for this recipe. Please, feel free to browse and ask questions on anything you see listed below.**

2 thoughts on “Buchu Kimchi (부추김치) – Garlic Chives Kimchi Recipe”
Megan Gleason
Grace Hsui